Contents
Sibelius VDL Template Readme
Copyright © 2012-2023 Hugh Smith; All rights reserved. Distributed by The Write Score
By downloading and/or using our product(s), you consent to our Terms of Service and the licensing agreements.
Important Information
Sibelius VDL Template 7.0a, April 2012
This Readme is to be used with these Template files (items in parenthesis indicate what version of Sibelius they are setup to open in):
- VDL_Template_7.0a_(Sib6).sib **
- VDL_Template_7.0a_(Sib7).sib
Both of the above Template files need to use the sound set file named:
- VDL_SoundSet_7.0a.xml
** Compatibility: This Template package contains support files that allow the user to use the VDL Template 7.0a custom instrument definitions in all versions of Sibelius since v6 and higher. The setup instructions will focus primarily on Sibelius 7, though specific differences between other versions will be noted.
A birds eye view of where to access the sounds during note input with a MIDI keyboard or Sibelius’ built-in keyboard can be found in the file named VDL_Maps_7.0a.pdf. The unpitched percussion mapping diagrams and Template defined Dictionary items can also be found in this document.
When the term “VDL” is used, it will be referring to the Virtual Drumline sample library from Tapspace Publications.
When the term “Template” is used by itself, it will be referring to VDL Template 7.0a.
When the terms “KP” or “Kontakt Player” are used, they will be referring to all versions of Kontakt Player that are compatible with the various versions of Sibelius.
Sibelius 6 runs in 32-bit mode only. Sibelius 7 can run in 32-bit or 64-bit modes. Sibelius 8 and higher run in 64-bit mode only. This makes a difference when choosing which version of Kontakt Player to use. We’ll be discussing this later in the document.
“TWS” refers to The Write Score.
As we move along in this document, be aware that not all of the features of Sibelius will be discussed in detail. If you feel you need to reference something that we do not specifically cover, please be sure to use your Sibelius Reference Guide to find what you’re looking for.
This Template is for new projects going forward. If you have scores that originated outside of this template, please see Appendix A for possible conversion scenarios.
The primary reason for this Readme is to guide you in using the Template. Once you get the hang of it, you won’t have much need for this document.
All TWS template packages available for download are placed in .zip archives. You will need to unpack their contents to access the enclosed files. Please read this FAQ if you have trouble doing so.
Please direct your Product Support questions to the TWS Forum. The template developers are setup to handle those sorts of inquiries there.
Your Writing Environment
Items that you will need to have before you can start using this Template:
- Sibelius 6, 7, or higher (includes Ultimate, etc)
- Virtual Drumline 2.5, library version 2.5.5
Install Sibelius
Whether you are upgrading or buying new, you can find the Sibelius software main web page by following this link: https://www.avid.com/sibelius
Once you have Sibelius installed, be sure to update to the latest version. https://my.avid.com/account
If using Sibelius 6, you’ll need to be sure you’re using the latest update for that version (use the Avid account link above to download it):
- Sibelius 6, version 6.2
Install Virtual Drumline
Install the VDL library from the installer (from disc or download), then go here to make sure you’re using the latest update: www.tapspace.com
The latest VDL library update is 2.5.5. VDL 2.5.5 is REQUIRED in order to make use of all the instruments defined in this template.
Install Template Sound Set
Find the file labeled VDL_SoundSet_7.0a.xml and copy it into one of the following folders * (this file is included within the VDL Template zip package you downloaded):
Windows 7 / 10 / 11:
Sib 6: C:\Users\your username\AppData\Roaming\Sibelius Software\Sibelius 6\Sounds
Sib 7: C:\Users\your username\AppData\Roaming\Avid\Sibelius 7\Sounds
macOS:
Sib 6: /Users/your username/Library/Application Support/Sibelius Software/Sibelius 6/Sounds
Sib 7: /Users/your username/Library/Application Support/Avid/Sibelius 7/Sounds
Sib 8+: /Users/your username/Library/Application Support/Avid/Sibelius/Sounds
* If it’s not already there, you’ll need to create the Sounds folder yourself.
Why do I need this particular sound set?
- A sound set is an XML file that has all of the relevant information allowing Sibelius to communicate with whatever library/device the sound set is written for. In this case, the VDL SoundSet 7.0a sound set will allow Sibelius to correctly sort out all the instruments, techniques, articulations, controllers, and keyswitches for every instrument in the Template.
- This sound set has been customized to distinguish itself from any other sound set that a user may have in use in a particular Playback Configuration. We want specific patches to be loaded – especially if other sample libraries are in simultaneous use.
NOTE: Make sure that you install and use the sound set that you downloaded with the Template so all the instruments that we’ve defined will function properly.
Now that you have installed Sibelius, Virtual Drumline and the included sound set, let’s set up your Playback Configuration.
Playback Configuration
Once the software has loaded, navigate to Play > Setup > Playback Devices. One of the first things you will need to do before you open the Template is set up a Playback Configuration.
- Click on the “New” button.
- Name the new configuration to suit your liking.
- Activate Kontakt Player. Double click the field under “Sound Set” to get the sound set drop down menu, select the VDL SoundSet 7.0a sound set.
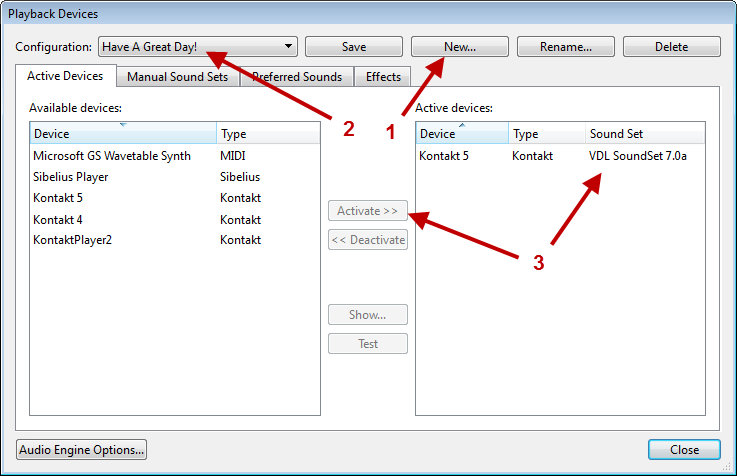
In order to help you find the required sound set in the Sound Set drop down menu, we modified the name in regards to how it will show up in Sibelius. Be sure to select and assign the sound set labeled “VDL SoundSet 7.0a”.
Using Multiple Libraries
When using more than one template from The Write Score, you will likely need to have your configuration setup a little differently than described above. For an example of what it would need to look like, please read the Post-Merge Checklist / Playback Configuration section in Appendix D.
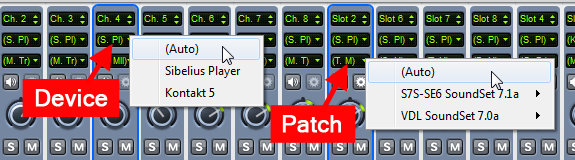
IMPORTANT: For the best results, each instrument that you use from this Template should have their Device and Patch assignments in the Mixer both set to (Auto). The custom instrument definitions and sound set will do all of the correct patch loading for you. (The Sib 6 Mixer looks different, but the same applies to it as well.) You shouldn’t ever need to manually set them to (auto) as this is the state that Sibelius gives each staff by default.
Kontakt Player
In case you missed it on the previous page, here are our notes concerning the various versions of Kontakt Player and what your options are for using them in the differing versions of Sibelius.
- Sibelius 8+ will only see VST/AU plugin files that are 64-bit.
- Sibelius 7 64-bit will only see VST/AU plugin files that are 64-bit. One of the 64-bit versions of Kontakt Player 4 or Kontakt Player 5 will be needed to utilize VDL while Sibelius 7 is in 64-bit mode.
- Sibelius 7 32-bit will only see VST/AU plugin files that are 32-bit. All three 32-bit versions of Kontakt Player (2, 4, 5) can be used within this version of Sibelius.
- Sibelius 6, 32-bit only. Kontakt Player 2 or Kontakt Player 4 can be used in this Sibelius version. KP5 is not compatible with Sibelius 6.
IMPORTANT: All instances of Kontakt Player in the Active Devices column that are used for Virtual Drumline need to have VDL SoundSet 7.0a assigned.
Kontakt Player is available as a free download. Please visit this TWS forum topic for instructions on obtaining the KP version best suited for your setup.
RECAP:
- You’re running one of the following versions of Sibelius:
- Sibelius 7 or higher (includes Ultimate)
- Sibelius 6.2
- You’re running the latest version of the VDL library
- You’ve installed the VDL sound set (“VDL SoundSet 7.0a”)
- You’ve created a playback configuration that will use this sound set.
- You’re running one of the following versions of Sibelius:
With the above steps completed, it’s time to open up the Template and get working!
Adding Instruments to the Score
After you’ve opened the .sib file named “VDL_Template_7.0a”, navigate to Home > Instruments > Add or Remove; the dialog box that appears will look similar to this:
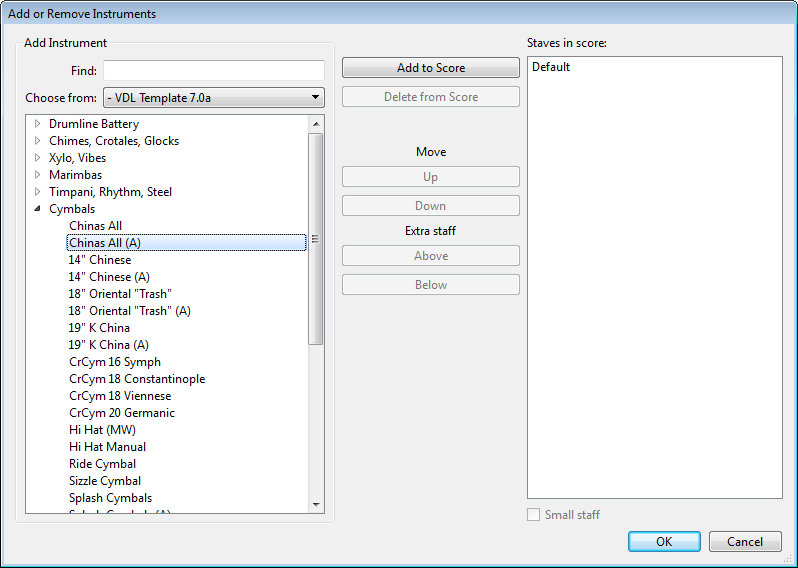
Select the “- VDL Template 7.0a” Ensemble from the Choose from drop down list. Open the Family you want to choose the instrument from (Cymbals in the image above), find the instruments(s) you would like to add to the score, then do so.
After you have filled up the Staves in score field, you can order them however you wish by using the Up/Down buttons. Click OK when you are done playing around in this dialog.
Overview
Each pitched instrument listed in the Maps file will have the following (if applicable):
- Keymap – Shows the trigger range of the patch file; also used for note input.
- Sounds Chart – Shows what sounds are available and what Dictionary Items access them.
Each unpitched instrument listed in the Maps file will have the following (if applicable):
- Input Map – These are very similar to the keymaps except that the layout may have been modified for the sake of user friendly unpitched instrument note input.
- Mapping Diagram – Shows how the unpitched instrument has been mapped within Sibelius.
- Input Variables – Gives the user more flexibility when entering notes for unpitched instruments.
Pitched Instruments
Pitched instruments will be a more straightforward than the unpitched instruments and not require as much explanation as to what we had to do to set them up in the Template.
Controller Changes & Keyswitches
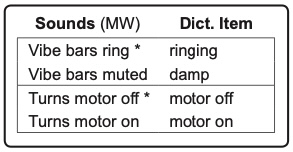 The controller changes and keyswitches that are used in this Template will be processed by the VDL sound set and Template defined Dictionary. All you’ll need to do is add the appropriate Dictionary Item to the staff and Sibelius will trigger the correct sound for you. The Sounds chart to the right is an example of what you’ll find in the Maps file.
Sounds Above the Range
If you’ve been using VDL for a while you may have noticed that there are cymbal sounds mapped above the normal playing ranges in several of the keyboard patches. And if you’re new to Sibelius’ SoundWorld format, you would soon find that accessing them is not quite as easily accomplished as before. However, from now on, when using this Template, all you need to do is simply insert an Instrument Change into the staff and choose one of the many cymbal options from the Cymbals Family.
Unpitched Instruments
If you use an unpitched instrument definition that has not been specifically defined to correlate to the library patch file you want to hear the sounds from, you may have some unique challenges in getting Sibelius to correctly interpret your intent. By using the percussion mappings we’ve setup in the VDL Template, you can be certain that not only will the correct sounds be played during playback, but you will also know what it will look like before you even enter any notes into the score. These assignments can be found in the Mapping Diagrams found in the Maps file.
NOTE: A sample Input Map and Mapping Diagram can be found at the end of this section.
When entering notes into unpitched instrument staves with a MIDI keyboard via step-time entry, Sibelius will place the correct notehead on the correct staff line/space for you, simply based on the pitches you’re entering, which is why using a MIDI keyboard can save you tons of time! Additionally, it may be good to know that using the built-in keyboard in Sibelius will get you the same input results.
Below are a few of the important things to be aware of regarding the unpitched instruments we’ve defined in this template.
Articulations
When you get into the mapping diagrams, you will see that only a few of the notes have articulations that are assigned to them. These instrument mappings have been optimized to allow you more flexibility as to whether or not you choose to use articulations in your scores. The vast majority of notes will not require an articulation to be applied for proper playback to occur.
NOTE: In any given instrument, each notehead and articulation combination must be unique on a per line/space basis.
If there are duplicates in the mapping, then the staff will more than likely not play back the way you want. This is a critical aspect of SoundWorld, but if everything is set up properly, it is very user-friendly indeed.
The articulations that may be used in this Template include the following and line up with the picture below from left to right/top to bottom:
Keypad 1: Accent, Staccato, Tenuto.
Keypad 3: Z on stem, 4 Tremolo, 8 Tremolo.
Keypad 4: Custom Articulation 1*, Wedge, Marcato, Staccatissimo, Plus/Closed, Upbow, Downbow, Harmonic/Open.
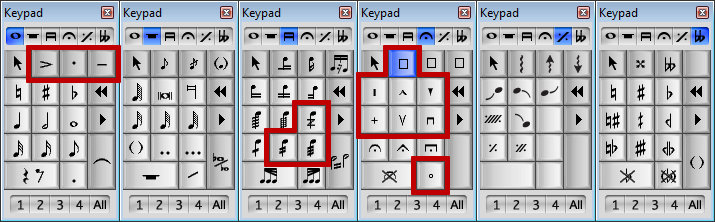
* The Inverted Mordent symbol is assigned to the first position available of the Custom Articulation spaces (4th keypad, in blue, above the Marcato). This has been assigned this way to help facilitate the crush sounds’ Input Variables. VDL users will need to make sure to not change this setting.
IMPORTANT: In the unpitched instruments’ diagrams, if a note has an articulation assigned to it, this articulation must also appear in your score in order for the correct VDL sound to be triggered.
NOTE: If you want to change an articulation in a percussion mapping to suit your personal preference, make sure that you experiment in a file that you use just for that. Then, if everything goes as planned, you can do it for real in the file you intend to use the change in.
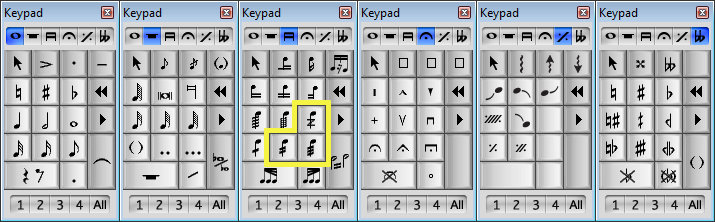
Tremolos
Yellow highlights: In the mapping diagrams, the yellow highlighted notes’ playback will be dependent on the notehead that is assigned to it. So for example, if you’ve entered notehead 0, but the roll you want to playback is assigned to notehead 20, it won’t playback properly until you’ve changed the notehead to 20. At that point you may choose to use any of the tremolo (slash) notation, Z on stem, or none at all. *
The tremolos that can be used with any of the yellow highlighted notes include these (also shown in the following keypad picture).
- • 4 tremolos (2 slashes)
- • 8 tremolos (3 slashes)
- • Buzz roll (Z on stem)
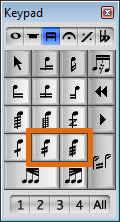 Orange highlights: A few of the instruments have orange highlighted notes in their diagrams. These noteheads REQUIRE either a 2 slash tremolo or a 3 slash tremolo to get that sound (except on the release note of a tied roll). This part of the setup allows the roll sounds to “release” properly without re-triggering at the end of the roll.
* There are exceptions to the yellow highlight rule. In a few pages we’ll discuss Input Variables.
Controller Changes & Keyswitches
The controller changes and keyswitches that are used in this Template will be processed by the sound set and Dictionary. All you’ll need to do is add the appropriate Dictionary Item to the staff or note and Sibelius will trigger the correct sound for you. Additionally, just changing a notehead to a different number, or moving the note up or down on the staff could also change the sound (view each instrument’s diagram for what is available). The main thing here is that Sibelius does the vast majority of the work for you with just a few simple commands.
Alternate Mappings
Several of the instrument definitions in this Template have been duplicated and their mappings modified so as to give you more options as to the way you notate your music. Each of these instruments’ names has been appended with “(A)” so you can easily spot them in the list. You can view the specific differences between the alternates and their originals by looking at and comparing their individual mapping diagrams.
One example of this is with the SnareLines. Some users like to write their snareline parts primarily on the “A” space rather than the “C” space. The alternate snareline instruments, with their main notation on the “A” space, fittingly are the ones that have the “(A)” at the end of their names. To be aware of the differences between them, and to know which one you need to choose to fit your preference, please reference their diagrams.
Another set of instruments we’ve done this to are from the Cymbals family. The main items modified with these is instead of regular shaped noteheads for cymbal rolls, you can notate them with “x” noteheads. Again, see their diagrams for the details.
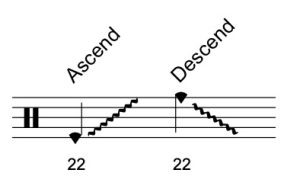 Glissandi Markings
There are several instruments in this Template that have glissandi that ascend, descend, move up and down, etc. The notation for these has been designed to be positioned on the staff so that you can add various line markings if you so choose. None of these markings is required for playback, we’re just letting you know that these kinds of sounds have been setup for possible practical use.
Naming Convention
Every Kontakt patch in the VDL 2.5.5 library has a corresponding instrument defined within the VDL Template*. If you open the Instruments window (shortcut: I) and click to get the Ensemble drop down list, you’ll see that there is an ensemble called “– VDL Template 7.0a”. Within that ensemble are various “Families” containing different categories of VDL instruments. This should all be pretty self-explanatory.
Once you’ve assigned instruments to your score, or if you do instrument changes mid-staff, you can view which instrument is loaded if you have View > Invisibles > Hidden Objects checked. By viewing Hidden Objects, you’ll see that the instruments (or instrument changes) in your score will display the hidden text which will in turn give you an indication as to which Ensemble it’s a part of.
The grayed out (hidden) text will not appear in the printed score. However, you may wish to deactivate Hidden Objects prior to printing, or put a line break into your staff names so the hidden portion of the instrument name doesn’t affect the spacing between the staff name and the left bar line.
* Well, not quite all. Here’s the list of NKI patch files that do not have an instrument defined: Finale Marching Perc Map, SnareLine VDL1, TenorLine VDL1, BassLine VDL1, and all the patches in the Finale Specific Instruments folder.
Inputting Notes
With A Keyboard
Most people find the easiest way to input notes into the score is to use a MIDI keyboard that is attached to their computer. When you type in a pitch on your MIDI keyboard, Sibelius will correctly and automatically input the notehead which corresponds to that sound and it will be placed in the correct location on the staff.
Once you have entered notes that have articulations assigned to them, you will then have to add the corresponding articulations so the program knows which sounds to trigger in Kontakt Player. You can also add them as they’re being entered, just depends on which way you like to work.
The keymaps and Input Maps specifically designed to be used with this Template are in the included file labeled VDL_Maps_7.0a.pdf. These maps not only show you where to access the sounds in relation to a MIDI keyboard, but they also contain the Template Dictionary Items, notehead variations, and articulations (if necessary) that you will need to know when using a MIDI keyboard for note input. Read the instructions in that file for more information.
Without A Keyboard
If you choose to not use a MIDI keyboard, you can enter notes manually and edit the notehead numbers and/or staff placements afterwards so they reflect the assignments defined in the mapping diagrams. Or better yet, the octave number listed on every C key of each Input Map can be used as a reference of where to click Sibelius’ built-in keyboard to get the same input results as if you were using a plugged in MIDI keyboard.
Entering Modwheel Changes & Keyswitches
You won’t have to manually enter controller changes or keyswitches. The Dictionary Items, sound set and applicable percussion mappings will handle all these switches for you.
Again, the sound set is an important part of how all this is designed to function. Make sure the correct one is assigned in your Playback Configuration.
Changing Noteheads
 The TenorLines and BassLines have various sets of sounds that are mapped onto one MIDI pitch. In the old days, you would have needed to use a MIDI message in the score to move the modwheel to get the various sounds. Today, thankfully, there’s an easier way. All you have to do is change the notehead to the correct number for the sound you want displayed and played back.
The Input Maps where this idea is applicable have reminder charts, like the one just above, otherwise you can view all this in the diagrams. The simplest way to change a notehead is to use the shortcut key Alt+Shift+noteheadnumber on Windows, or Option+Shift+noteheadnumber on Mac.
Input Variables
When you come across a diagram that has bracketed notes (as seen in the example below), these indicate sounds with Input Variables. An input variable allows you the option to choose different input methods to achieve the same result for certain sounds. When you see Input Variables within the mapping diagrams, the first note displayed will not have an articulation (could be yellow highlighted though). Any subsequent notes will have articulations.
Depending on how you prefer to work, this feature gives you added flexibility when inputting music and may not require as much need to alter notehead numbers when working with or without a MIDI keyboard.
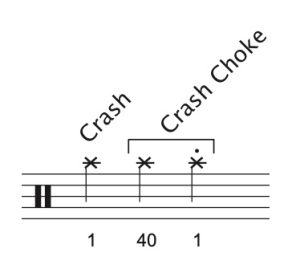 The example to the left is from a Cymbals instrument. Say you enter notehead #1 into your cymbal part to get the “crash” sound, but you then change your mind and decide to go with a “crash choke.” Rather than changing the note to notehead #40 (which you can still do if you’d like) simply add a staccato onto your previously entered notehead #1. Voila! Insta-choke!
Not all of the Input Variables function quite the same way, but as you work with the mapping diagrams, you’ll start to get a feel for the designed functionality. These variables are reflected in the input maps as well.
IMPORTANT NOTE: Keep in mind, when using a MIDI keyboard, the resulting notehead entered will be the first one you see listed within the bracketed Input Variables. Subsequent noteheads within the bracket illustrate how applying an articulation can alter the sound on a note using a more commonly or already used notehead.
Here’s an Input Map and Diagram example from the Maps file:

Playback Dictionary
NOTE: The dictionary items used by this template are listed on a per instrument basis. Please refer to each instrument’s Map in the file VDL_Maps_7.0a.pdf.
For a long time now, Sibelius has used a powerful feature called Dictionary to control certain things playback-wise. We can do a lot with it to control certain aspects of the Template without needing to resort to cryptic MIDI messages. You can always view what’s available in the Playback Dictionary by going to Play > Dictionary. We’ve already setup the playback functions for VDL in this Template, so as long as you’re using the dictionary terms supplied with each Map (if applicable), everything should work as expected.
A valuable feature of the Sibelius dictionary is that it can perform certain tasks based on the articulations used in your parts. For example, you may write a part for Timpani that is supposed to roll (tremolo). So you put three slashes on the note so your timpanist knows it’s a rolled part. Since VDL contains actual sampled rolls, Sibelius will see these slashes, reference the dictionary and the sound set, and realize this means it needs to playback VDL’s sampled rolls. It will also ensure that it doesn’t try to “fake” the roll by performing a series of MIDI attacks since the sound set has told Sibelius that this is an actual roll sample. This is a hugely time-saving feature of Sibelius’ playback system. This sort of feature works for any VDL patch that has sampled rolls or tremolos.
Under the hood, what most of these definitions in the dictionary are doing is performing “sound ID changes” to create a new outcome. So for example, when your Electric Guitar staff encounters the word “mute” essentially Sibelius interprets that as +mute, which will alter the sound of that instrument. Sound ID’s can get pretty complex and there can be many variables at play, but the way the sound set has been designed, you shouldn’t have to deal with them directly.
If you were to study the many sound IDs assigned in the dictionary, you’d see that [reset] is a sound ID change used frequently. This removes all previously applied sound ID changes on the staff resulting in the reset of the instrument’s altered mod-wheel/keyswitch settings back to their default states, with no extra sound IDs affecting it. In any instrument, you can always return to its default state by typing nat. into your score. nat. will activate the [reset] sound ID message, and in many cases will look at home in your score.
You may find certain dictionary terms to be items you don’t necessarily want to print in your score. Simply hide the text by selecting it then going to Home > Edit > Hide or Show. Alternately, you could use a tilde (~) and as always, Sibelius will hide anything you type after it.
For Advanced Users
With the bulk of the busy work of the unpitched instrument mappings created already, tweaking them to your own customizations may not be very daunting at all. As stated earlier, proper playback is contingent on there being only ONE notehead/articulation combination per line or space on the staff in each instrument mapping. You don’t have to have an articulation assigned, but whatever you have has to be unique to that line/space.
Once you’ve learned the system, you’ll find it’s not difficult to make a copy of one instrument, name it to your own convention, and then alter away.
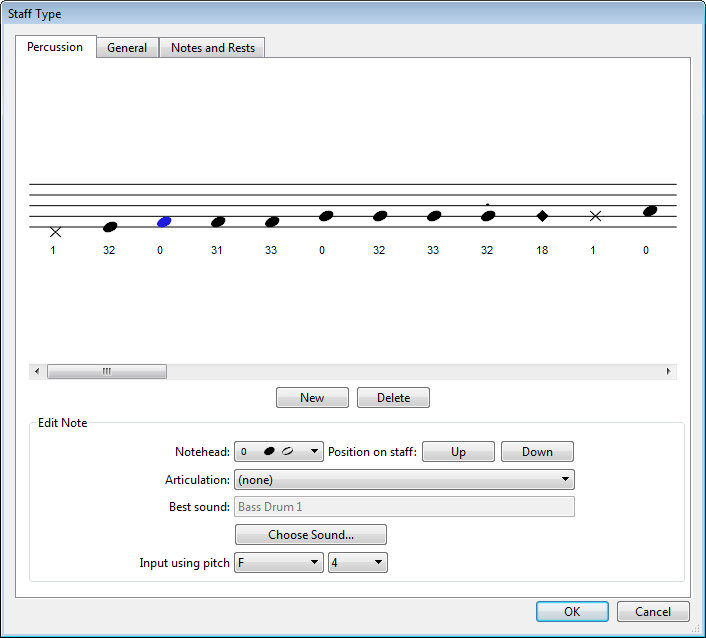
The Percussion tab of the Edit Staff Type dialog box will look slightly different in Sibelius 6.
Moving Notes Up / Down on the Staff
The main area to pay attention to is the Input Using Pitch field which will change if you move notes up or down on the staff in the Percussion tab of the Staff Type designer. Keep a mental note of what the pitch is before you move it so you can change it back to what it should be after you have moved the note up or down on the staff.
NOTE: As stated earlier, it might be a good idea to make whatever modifications you want in a “test” file first. Then, when the results you want are achieved, make those exact same changes in the file you will be using them in.
Noteheads List
If you were to create a new file using Sibelius, you would see that there are only 31 noteheads available to you (numbers 0 thru 30). These are the default/stock noteheads that Sibelius provides its users “out of the box”.
In this Template, the original 31 noteheads have not been modified in any way. However, in order to be able to map the larger instruments we had to make several “twin” noteheads to be used along with the originals.
You may have already noticed in the diagrams that certain noteheads were used over and over again – and usually for similar kinds of sounds. This was not done just for the persons who may be using this Template in their music writing, but also for the musician and or student who will be reading and playing the music that is written.
And yet, we know there will still be users who will want to change things to suit their personal preferences. With this Template – and more so the features in Sibelius – it will be much easier to do so compared to previous versions.
WARNING
Changing any part of the definition of a notehead can have adverse side affects when merging templates (Appendix D). Proceed with caution.
Crossover Noteheads
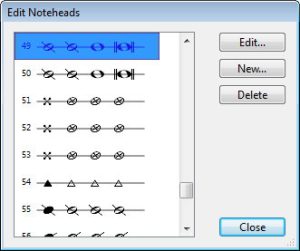 Notehead numbers 49 and 50 have been reserved for crossover noteheads (used in some of the drumline instruments). If in fact you do want to change them from what we have listed in the mapping diagrams, here is how you can do it.
Navigate to Notations > Noteheads > Edit Noteheads. Scroll down to noteheads 49 and 50, select the one you want to edit, click the Edit button.
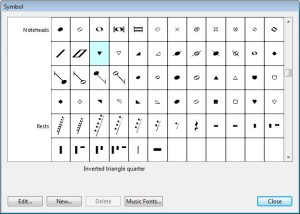
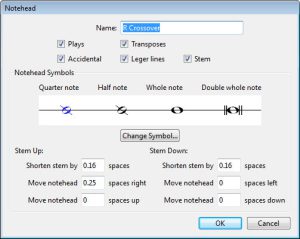 More than likely you will only need to edit the quarter and half notes. Once you have selected one of them click on the Change Symbol button.
 Depending on which symbol you choose, you may or may not have to change the “Move notehead __ spaces right” value so that your newly chosen notehead lines up with the stem correctly. A little bit of trial-and-error will get you to your destination.
In Closing
Congratulations! You are now at the end of this Readme and as such you are on your way to becoming a true Sibelius/VDL guru!
We’re always looking for feedback. If you happen upon anything that doesn’t work the way we’ve described here, have template feature suggestions/requests, or just want to say “This is the best writing tool ever!”, please be sure to let us know through our Forum or Contact page.
TWS Forum: forum.thewritescore.com
TWS Contact page: thewritescore.com/info/contact/
Appendix A
Identifying Template Versions
In all of the Sibelius Templates distributed by The Write Score, we’ve created a separate Ensemble for each library-specific set of instruments and they’ve been named in accordance to whichever version of Sibelius the template specifically applies to.
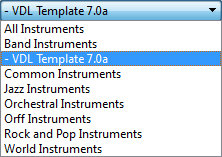
To check if you started a score that contains the VDL Template, simply go to Home > Instruments > Add and Remove and look at the “Choose from:” (Ensemble) drop down list. If you’re just using the VDL Template, you’ll see the same as the image to the right.
The importance of knowing this comes into play if you have scores that originated in previous versions of the VDL Template (SoundWorld versions). You can still continue to use those scores as they are, but you’ll need to make sure you have the correct sound set assigned in your Playback Configuration for that specific template version you’re using.
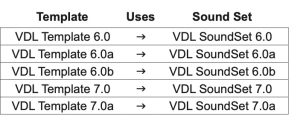 Here is a chart showing the correlation between them. Again, when continuing to work in older scores, the sound set version has to match the template version for proper playback of all sounds to occur.
Updating Older Scores
Scores you’ve written in prior to having the VDL Template can be “updated” by following the steps below:
- For pitched instruments: Copying notes from the original score and pasting them into the VDL score should be all you need to do for this.
- For unpitched instruments: You will need to manually re-enter everything into the VDL score due to the differences in the instrument definitions’ notehead assignments.
- Some minor tweaking may be necessary to match the formatting elements of the original score.
DISCLAIMER: The older the file is that you want to merge with this Template, the greater the odds that there will be differences in noteheads lists. When Sibelius looks at each file to see what it needs to do for the merge and if it sees that there are discrepancies between them, duplicate noteheads will be created to compensate. Once this happens, there could be “corrupted” notehead assignments in percussion instrument mappings. This is the primary reason why we recommend the above process instead of exporting/importing House Styles.
Now, with that said, feel free to follow the instructions given in Appendix D to import this Template’s House Style into your existing score. It won’t hurt to experiment.
Appendix B
TriggerTest
Do you have your Sibelius/VDL work environment setup properly?
There is a folder in the Template package you downloaded labeled “TriggerTest”. Contained within this folder is a set of sib files that has every template defined instrument and all the sounds, including Input Variables and switch variations, on the staves with which you can use to perform a TriggerTest.
The idea is to play each staff individually and watch the Kontakt Player keyboard to make sure each and every sound “triggers” the way they should. As each staff is played, the corresponding patch in KP will start triggering on the left side of the keyboard (keys highlighted in blue) and progress to the right, sequentially (for the most part), until it reaches the other end of the blue keys.
EXTRA: Another way to use the TriggerTest files is to just play them back and listen so as to get an overview of ALL of the sounds that are available in the Virtual Drumline sample library. There may very well be several sounds contained in the VDL library that you previously didn’t know about or didn’t know exactly what they sounded like.
Pitched
Each pitched instrument will start out with its range followed by any applicable sound variations by way of playing technique examples (i.e. staccato, tenuto, and so on).
Unpitched
Each unpitched instrument will have all of its diagram elements. First just the sounds in the sequence of the blue keys from left to right, then any applicable Input Variables and switches after.
TriggerTest Example Videos
To get a feel for how this works, you can find video examples on this TWS template videos page.
PLEASE BE ADVISED: These TriggerTest files were created during the development process and may not be complete. Use of these files for your writing projects is NOT recommended.
Appendix C
Export Manuscript Paper
Sibelius 7 +
With the Template open, navigate to File > Export > Manuscript Paper. Fill in the Name field with what you’d like to call it – we prefer to prepend the name with a “- “ to increase the odds of it showing up towards the top of the Manuscript Paper list so you don’t have to hunt and scroll to find it. Categorize this MP however you wish. Click Export. You’ve just created a Manuscript Paper based off of the VDL Template.
Now, any time you want to start a new score, all you have to do is go to File > New (shortcut: ctrl+n / cmd+n) to bring up the Quick Start dialog box. When you click the manuscript paper you just created, you’ll be presented with the following:
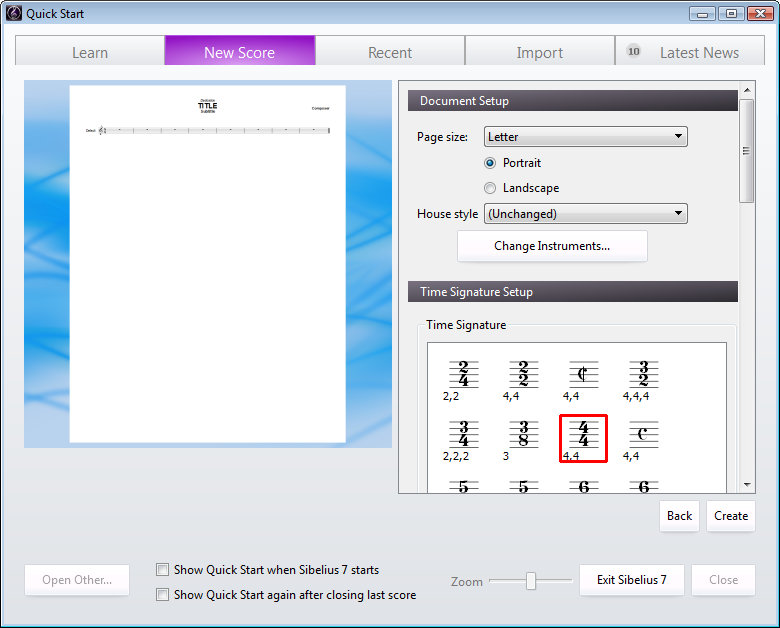
Choose the page size and orientation. Leave the House Style set to “(Unchanged)”. Click the Change Instruments button to go ahead and add the instruments you want – or do it later. Select the starting Time Signature. Click Create.
Sibelius 6
With the VDL Template open, go to File > Save As and rename the file by adding a dash and a space to the beginning of the name; should read “- VDL_Template_7.0a”. Adding the dash will increase the odds that it shows up at the top of the Manuscript Paper list so you don’t have to hunt and scroll to find it. (You can remove the underscores if you’d like.)
Next, navigate to File > Export > Manuscript Paper. Sibelius will ask if you’re sure you want to do this. Click Yes. That’s it, you’ve just created a Manuscript Paper based off of the VDL Template.
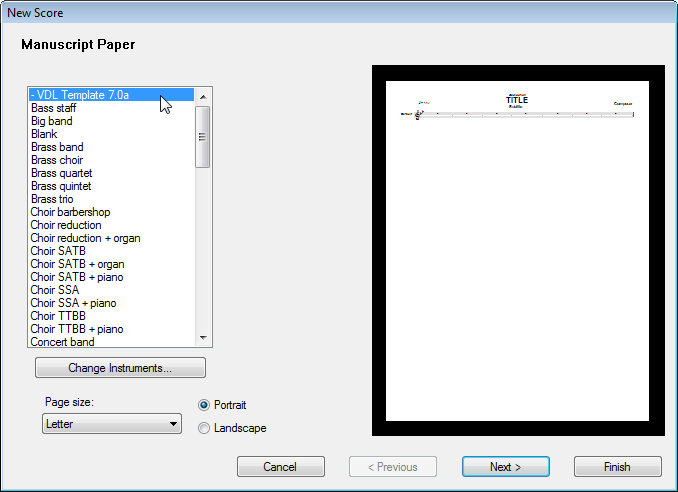
Now, any time you want to start a new score, all you have to do is go to File > New (shortcut: ctrl+n / cmd+n) to bring up the New Score dialog box, select the “- VDL_Template 7.0a” manuscript paper from the list (optional: by clicking Change Instruments you can insert them into the score from this dialog box), and proceed accordingly.
Appendix D
Merging Templates
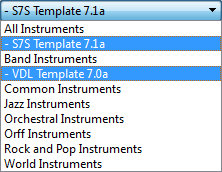
If you have purchased this template separate from other TWS merge-compatible templates, here is the quick and dirty on how to merge them into one file. In our example, we’re going to merge S7S Template 7.1a and VDL Template 7.0a together.
RECOMMENDED: Always make backups of each file before starting this process.
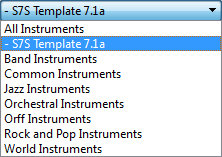
Let’s start by looking at what each file looks like before the merge. Open them both and in each one go to Home > Instruments > Add or Remove (shortcut: I). Here is what we see in their Choose from drop down lists:
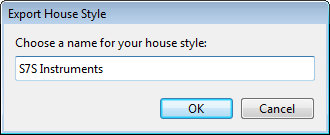
Next, from the S7S Template we’re going to export its House Style. Navigate to Appearance > House Style > Export; the dialog to the right will appear. Name the House Style however you wish, click OK.
We won’t need the S7S file anymore, so go ahead and close it if you’d like.
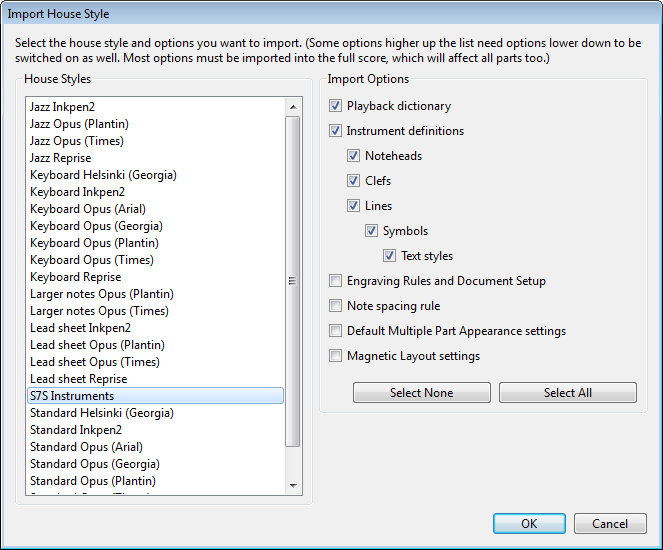 Now go to the VDL Template 7.0a file. Navigate to Appearance > House Style > Import. You’ll be presented with something like the image to the left.
At this point you have thousands of choices, but thankfully we’re only going to be dealing with two.
Choice 1 is to import the Playback dictionary and Instrument definitions just like the image to the left shows. These two options MUST be checked to bring in the relevant merge items. For most people this will be the likely choice.
Choice 2 is to bring in any or all of the unchecked options in addition to Choice 1. This may be necessary if there are certain settings – that apply to the unchecked options only – that you have modified from their defaults and want to keep.
After you have made the appropriate selections, click OK.
OK? OK.
 Now let’s go back to Home > Instruments > Add or Remove (shortcut: I) and see if this whole merge process worked.
And there they are, our two templates successfully merged into one file.
This may be a good time to rename this file. How about S7S-VDL_Bundle? And while you’re at it, go ahead and create a new Manuscript Paper by following the instructions given in Appendix C.
Can I use this same method to update my existing scores?
If you’d like to make use of this Template’s custom instrument definitions in your existing scores, by all means, apply the previous instructions to them. If you missed our comments on the known potential merging issues we mentioned earlier in this document, please go back up and read them by clicking here.
Post-Merge Checklist
Playback Configuration
Since you’re now using instruments from at least 2 different libraries in your score, you’ll need to have your Playback Configuration setup correctly. Let’s use the following example to illustrate.
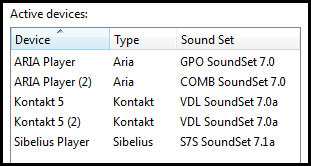 Say you’re using the TWS templates that are built for these four libraries: Sibelius 7 Sounds, Virtual Drumline, Garritan Personal Orchestra and Garritan Concert and Marching Band. You would need to have your Playback Configuration’s Active Devices list setup similar to the image on the left.
If you happen to have more than 16 total instruments, including Instrument Changes, that point to one specific library, you’ll need to have more than one instance activated to handle the number of channels/slots required to load them all (except for S7S with Sibelius Player). In this example, we’re heavy on percussion and need to have 2 instances of Kontakt Player to account for the 20+ VDL instruments in the score.
SET YOUR MIND AT EASE: Don’t be concerned about which instruments get loaded into which instance of whichever device. Since we’re using TWS’s Sibelius family of templates, the custom instrument definitions and sound sets from each one will take care of the correct patch loading for you.
Noteheads Count
We recommend you check to see that you still only have 64 noteheads after the merge (numbers 0 through 63). Navigate to Notations > Noteheads > Edit Noteheads (shift + Q) and scroll to the bottom of the list. If the last notehead is labeled 64 or higher, there has been at least one duplicate created during the merge process. This may not actually effect any of the instruments you may use in your score, but using the file in this condition is not recommended.
If All Else Fails
If you’re having trouble with the above process, or just aren’t comfortable with attempting to merge the files on your own, please use the TWS Contact page to submit a request to get a download code for a .sib file that already has the templates in it you need. Please be sure to include all applicable order numbers for faster request processing.